Evernote Blogging: How to Do It Right

There are so many platforms for blogging, it can take days to decide on the right one for you. If you want to focus on content and content only, you need to give Evernote a try.
Evernote is more than just a note taking app, it is a unique productivity suite with powerful tools and add-ons. But this is not the reason why countless bloggers use Evernote in tandem with their Postach.io blogs as a virtual workspace. The most vocal advocate of blogging with Evernote, Michael Hyatt, puts it nicely: Evernote is a “digital brain."
And he is not wrong—the app is in its own league. It is not a blogging platform, not a word processor, and not a note scribbling app. Evernote is all and none of these. It is a standalone desktop and mobile toolbox that puts the writing process front-and-center.
With Evernote, you can create and organize your ideas, drafts, and posts, publish straight to your Postach.io blog, and collaborate on notes with your friends and colleagues.
But Evernote’s unique selling point (USP) is the superior workflow it provides.
As a writer and entrepreneur, I am always discovering fresh ideas at the least opportune moments. Evernote makes it easy to keep track of my thoughts all the way to completion.
Sure—you can jot down ideas in any basic notes app. But if you are blogger, you realize that it takes more than a quick record of your thoughts to produce a successful post. It takes a commitment to research, organization, drafting, editing, editing, and editing some more to get that perfect version.
Evernote has advanced features that enable you to collect information from diverse sources in a single workspace. It is the supreme tool to gather screenshots, data, tables, images, podcasts, charts, and notes, and work them into a finished product. The Evernote team have worked hard to create an app that assists you in developing your post as well as writing it. It is a tool for writers who care about quality writing.
If you use it right...
Here, I reveal my top tips for blogging with Evernote, from draft to published post.
Get a FREE PDF With the Top 5 Ways to Grow Your Blog!
Research
If you are serious about writing, you do a serious amount of research.
Evernote has built-in tools to gather media and info from almost anywhere. Simple to use, yet versatile, they help you put down solid roots for an informative post.
While the native equipment gives you plenty to get started, Evernote also gives you the option to add external apps.
Web Clipper—one of the handiest research aids you can get—is an extension straight from the Evernote team. It is currently compatible only with Google Chrome. But it was worth switching out my browser for.
Web Clipper equips you to take screenshots of web pages, annotate, share, and save them to your Evernote notebooks. What’s more—this can be done without ever leaving your browser.
With options to clip web pages in full page, simplified, article, and bookmark modes, Web Clipper is more than a standard screenshot grab app. Install the extension and click on the elephant icon in the corner of your browser to start collecting clips. Save them to your research pool and start developing a solid foundation for your post.

(Source: Author’s screenshot)
To add the extension and start taking screenshots with Web Clipper, follow the steps below:
- Visit the Web Clipper landing page and add the extension to your browser
- Close and re-open Google Chrome and you will see an elephant icon has appeared in the top-right on your screen (on the toolbar)
- Click the elephant icon to bring up the Web Clipper menu
- Select each mode to preview what your clipped webpage will look like
- Press the green button to save the version of the webpage you want to your Evernote notebooks
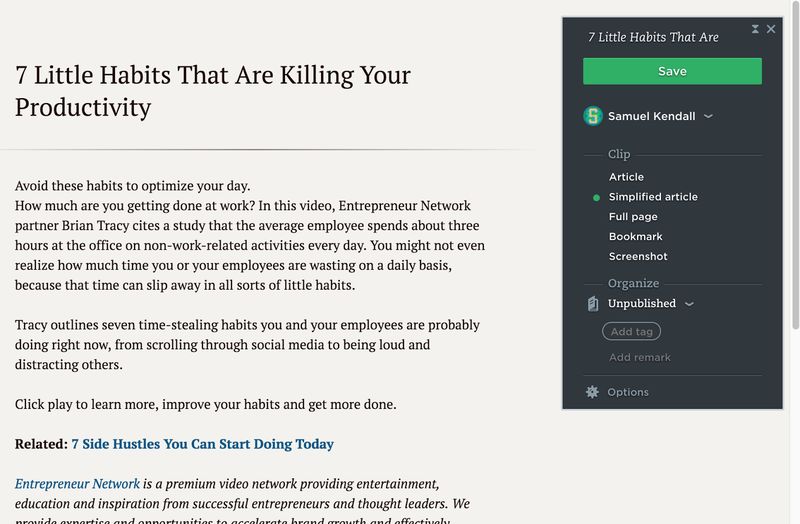

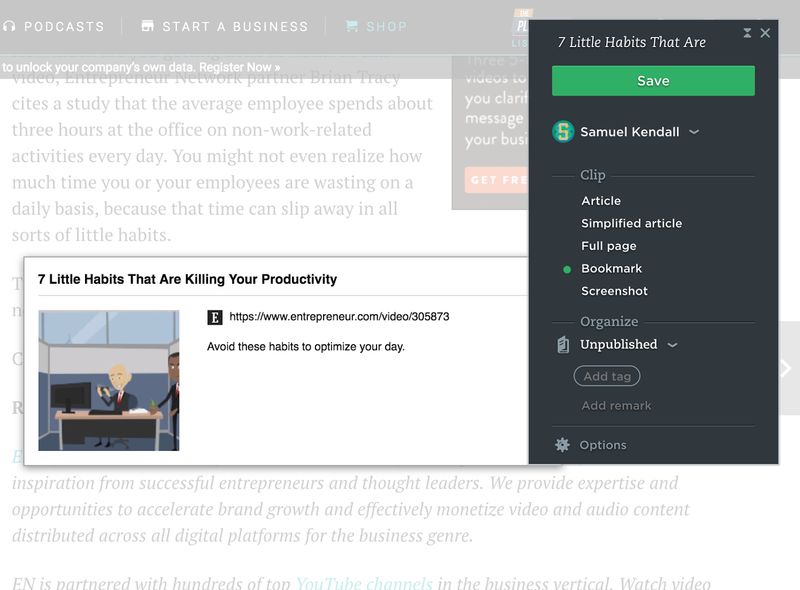

(Source: Author’s screenshots. From top to bottom: Web Clipper Bookmark mode, full page mode, simplified article mode, and article mode)
You can even annotate your screenshots with Web Clipper to highlight the parts of your clipped pages that are most relevant to your research, add additional text, and pixelate areas for data protection. For more information on how to use the Web Clipper app, visit the evernote site.

(Source: Author’s screenshot)
Of course, when your virtual life is organized to a T, the chaos of the physical world can get frustrating. A digitized repository of resources surrounded by piles of books, scattered notes, and business cards can hamper the productivity of your workspace. If only you had some way to make your physical resources taggable and searchable...
With Evernote you can lift text from magazines, newspapers, business cards, scribblings—anything legible. Handwritten or printed pages, Evernote transforms your papers into fully searchable content which you can copy, paste, edit, and innovate from.
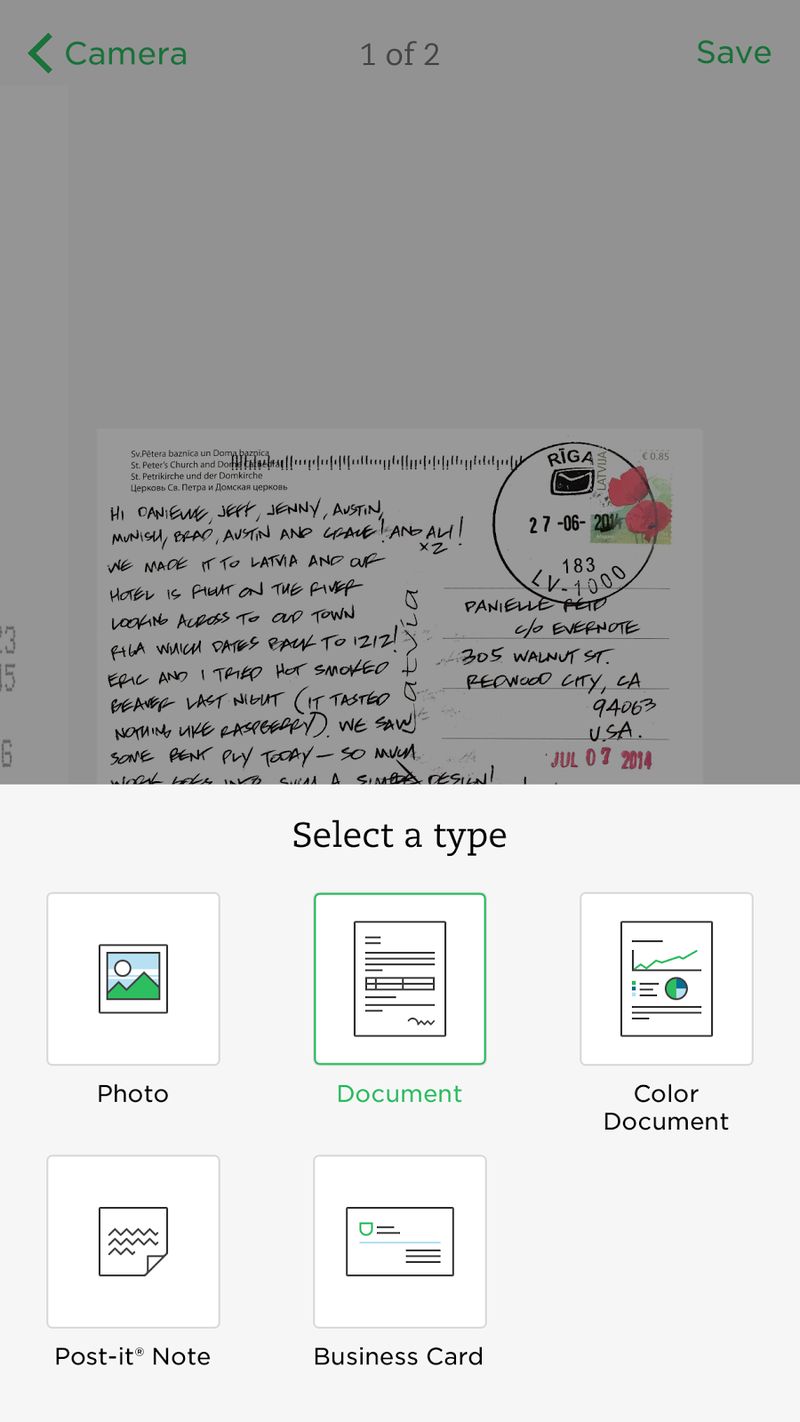
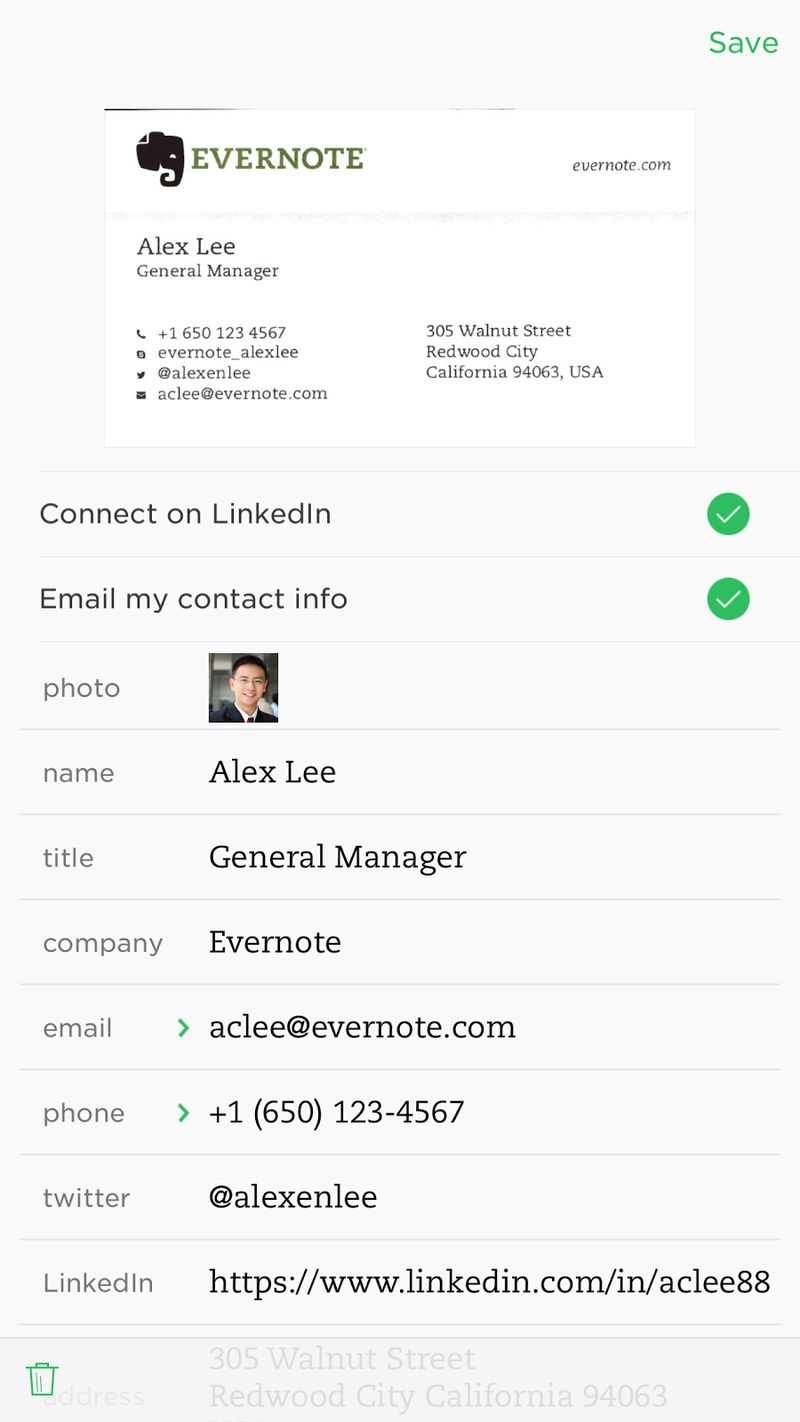
As inspiration strikes, I have a habit of jotting on the closest object I can find. This means a single paper note could contain information related to various topics and posts. Unfortunately, you can’t publish a handwritten napkin to a blog.

Digitizing my physical resources allows me to streamline my research so that everything is there for the taking. I type in what I want and I get it. If I happen to lose my papers, it’s no problem. I can find and view them on desktop, mobile, or my tablet.
Get your research in check so you can focus on your craft. Here’s how to turn your physical papers into digital resources using Evernote:
- Open the Evernote camera and take a photo of what you want to digitize using the Document function
- Choose the document type you want to photograph and select it so Evernote knows how to interpret your info
- Place your paper note on a contrasting background and tap to take your photo
- Save it to one of your notebooks for easy, searchable access at any time
Next time you need the phone number you wrote down at the back of that conference guide (you know you put somewhere...), type your contact’s name into the search bar. As long as you wrote the person’s name along with their number, Evernote will return what you need. Do this for business cards, postcards, as well as your own doodles (Please note: this function is currently only available to premium account users).

Research can cost you so much time. It does not have to. Use these hacks to unlock a more organized system for your resources. In turn, you will have more time to focus on how your write and what you write to reflect the information you glean.
Organize
The hard part about collecting all your research in one place is organizing it in a logical fashion. It can be difficult to transition from research to writing without first establishing structure.
If you structure your research into bite-sized chunks, it is quick and easy to find the resources you want when you need them most. Don’t interrupt your train of thought every couple of paragraphs to find a resource. Make it easy to understand your research and it will be a breeze for you to write the post itself.
Evernote offers two primary means of sorting your research into distinct categories. Some use Notebooks (which are like folders), others use tags. I find tags superior to notebooks because multiple tags can be added to a single document (or note) to categorize it for different purposes.
Notes
Notes are the individual documents within which you place your information. They are the “blank slates" you will fill with content and publish to your blog.
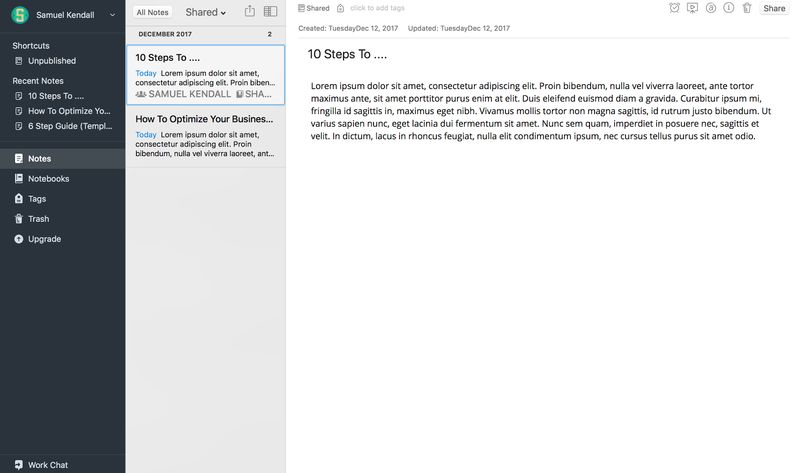
(Source: Author’s screenshot)
Notebooks
Notebooks are distinct folders you can store your individual notes in according to different categories and purposes. We recommend using them to sort your published from your unpublished posts.
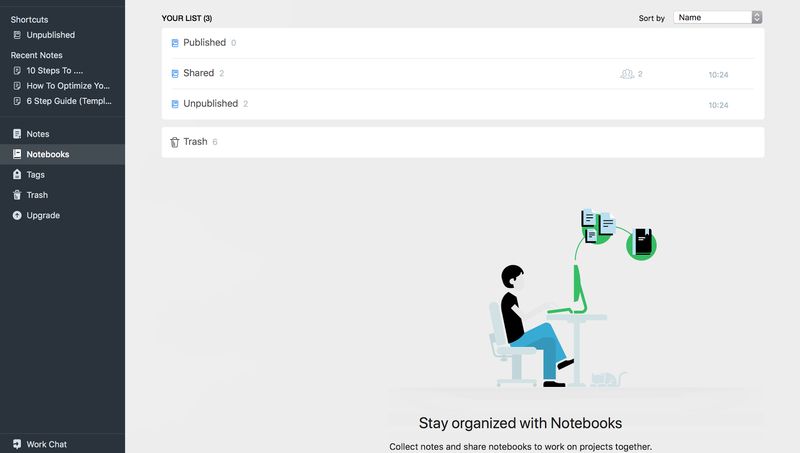
(Source: Author’s screenshot)
Tags
Tags within Evernote enable you to assign multiple descriptors to different notes. By clicking on each tag you are able to filter your search for notes according to different descriptors. You can also type tags into the search bar to find the associated notes.

(Source: Author’s screenshot)
You can only assign a note to one notebook—which is great if you use Evernote only for notes. But to grow your blog post from a repository of research into original content, you need to be able to sort your resources in a deeper way. Tags enable you to create unlimited categories to link your notes with to make the sorting process flexible and relevant to whatever you are working on at the time.
Adding tags to a note is simple. Go to the top of your note, type in a keyword and press enter to save. Your note can either be found by clicking on the tag or typing it in the search bar.
Develop a system for your tags so you can sort your notes by both topic and format. For example, newsletter and list-form. But also sort by process. I separate my writing into definitive steps so I can track the progress of a post without using a new note for each stage.
If my note is in the research stage, I tag it research. When I have developed it enough to start writing, I remove the research tag and replace it with a new draft tag. This means my research and writing are all on the same note, with the research just a swipe away as I draft my piece.
This is a great habit to get into if you are using Evernote to publish directly to your Postach.io blog. With Postach.io, just tag your note published when you are ready to go live and it will sync automatically with your blog.
Some writers use Evernote tags and never take advantage of notebooks at all. But Notebooks are great for putting all your best material away for safekeeping—specifically because only one note can be assigned to a notebook at a time.
Evernote offers a superb presentation mode for conferences and events—or if you need to read something you wrote in a beautiful format. Keeping my published posts in a separate place to my work in progress means I can show them to my colleagues and friends without giving them all my winning ideas. Keep your published posts in a published notebook for those show-and-tell moments.

Sifting through snippets of information from diverse sources can be hard. Molding them into a library of inspiration for your blog can be the difference between an unread blog post and a successful article.
But if you fail to sort your research into easily accessible categories and stages, you will have a hard time explaining it to your readers. Use Evernote at full capacity to filter your facts, figures, and thoughts and prepare you for smoother organizational workflow.
Draft
When I am at work, I write like Usain Bolt runs. But when I am working on content for myself, I struggle to stay on track. Your draft is when all that excellent research and organization comes to fruition: use the tools at your disposal so a blank page doesn’t get the better of you.
Evernote’s checklists are my starting point when working on a new draft. They’re simple, but effective.
No novelty here—just an understanding of the hacks that make writers lives easy. As well as an option for standard bullet points, Evernote’s checkboxes allow you to create discrete points on a list and tick them off.
Use these to create a goal-oriented “to do" list at the top of your draft. You can check off the items you complete as you go. This will help you to keep an eye on how far you’ve come and how far to go. Creating a strict plan in the form of a checklist and sticking to it could help you to avoid wandering into procrastination.
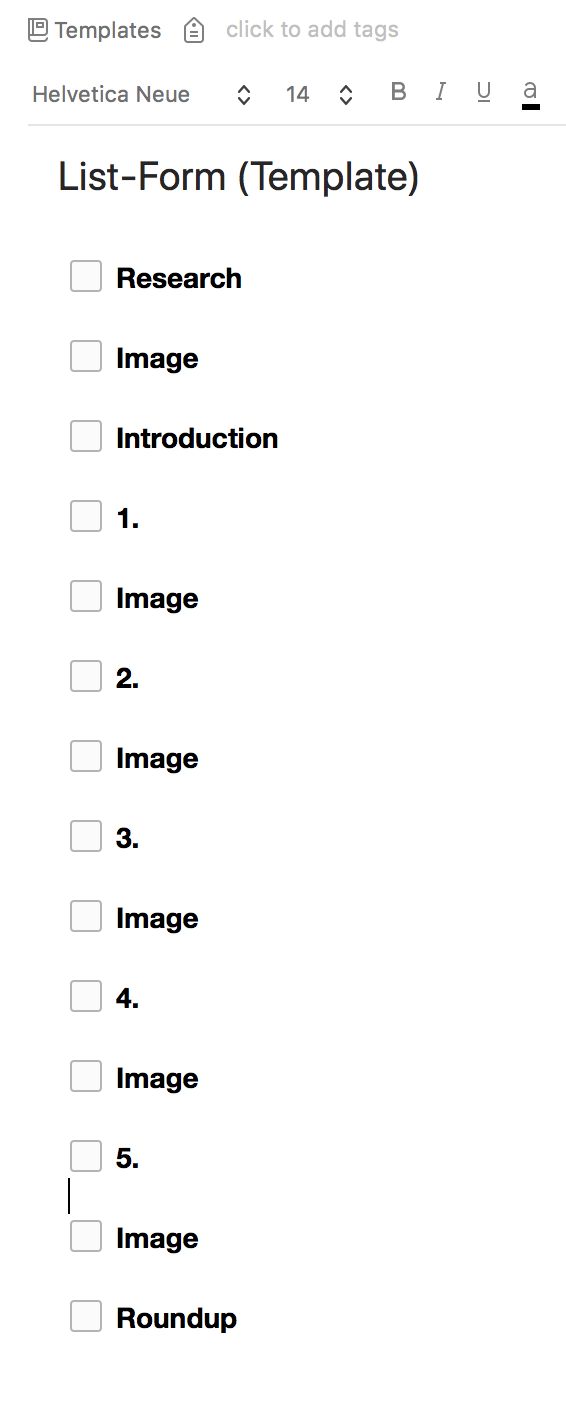
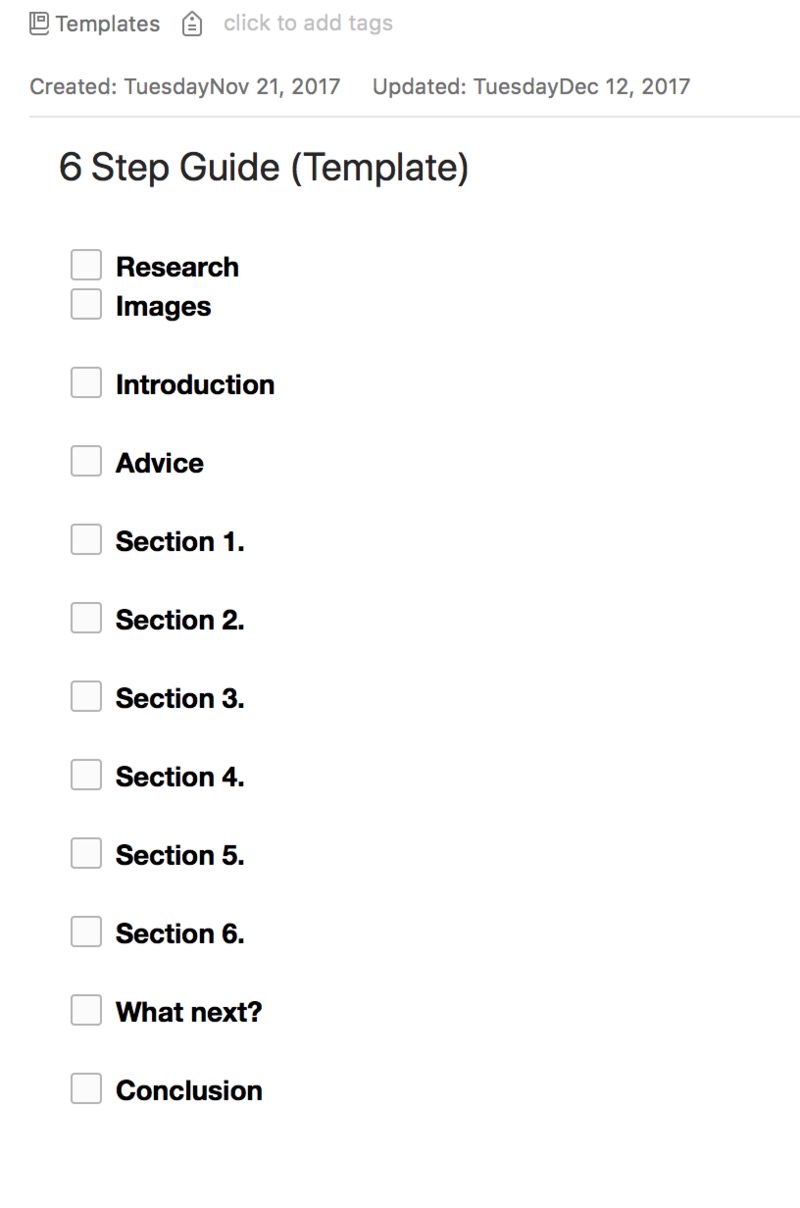
(Source: Author’s screenshot)
Combine checklists with customized templates to tap straight into your creative process every time you open up your app. Open a new note and insert checklists for headings and subheadings to mock up the templates you need. It is a good idea to do this for each format you write in.
My personal template notebook has many of these, including 6-Step Guide, Long-Form, Article, and List-Form. Give your template a name and drag-and-drop it to a new notebook. Call it Templates… or whatever you want. It’s up to you.
Keeping those templates in a separate notebook, just like you did with those published posts, ensures they don’t get accidentally edited. Be sure to make a copy in your work-in-progress notebook when you want to start bulking out a template into a post.
A blank page can put even the most expert writers off their game. With Evernote, there’s no need to start afresh every time. Use lists and templates to supercharge progress and keep it in check so you never lose track of your goals.
Collaborate
Collaborative tools are abundant. But it can be frustrating to keep multiple versions and edits organized between different apps. Evernote lets you collaborate natively as well as sync with external apps like Google Docs. Whatever your collaborators are using, make the process familiar to them and to you.
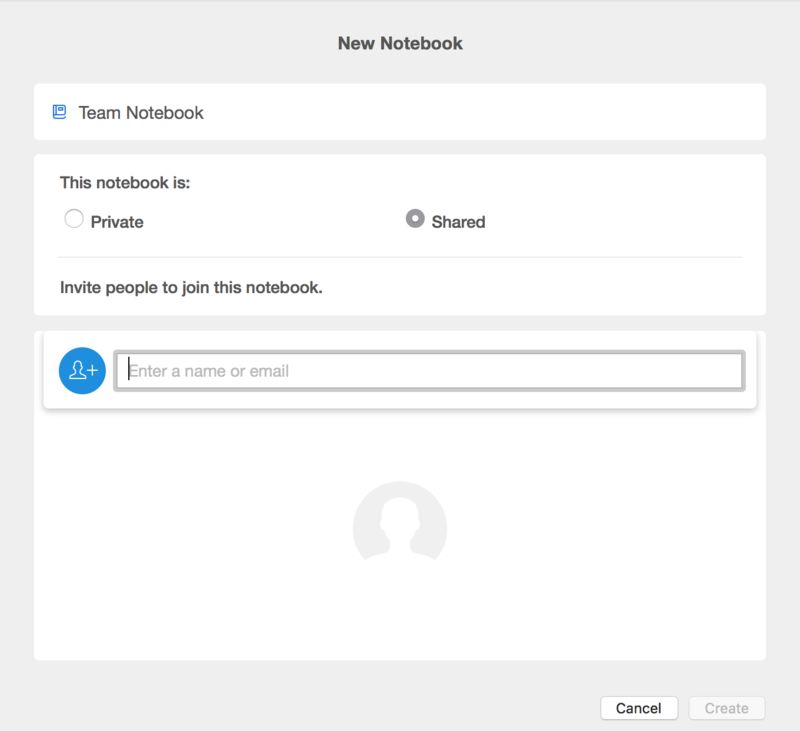
To use Evernote as your primary mode of in-house collaboration, create a shared notebook. This gives you all the options for collaborative work you need. Add collaborators with different permissions (to edit or view) and start sharing the load. Click File, New Notebook, and name it. Be sure to check the Shared field and invite people to join if you want to give them access. You can browse and edit shared notebooks and notes in the same way as your own. Get collabbing!
How to create a shared notebook for collaborating with Evernote
- Select New Notebook
- Name your notebook
- Select the Shared option
- Type the names or email addresses of your contact to give them access
(Source: Author’s screenshot)
But be sure to establish standard procedures for assigning tags to save confusion. As well as collaborating on writing, shared notebooks can be great for creating a pool of research that your colleagues can view, edit, and continually update. But it is important to keep them tidy so that everyone can find what they need. Making something easy for you to find may make it hard for everyone else.
Collaborating on work within a single application is much easier than flicking between two. But if you are working with writers from all over the world, the chances are they won’t all be using Evernote. Some just prefer writing in other applications—we all have our quirks. Evernote enables syncing and linking with the most popular applications for collaborative writing, for example Google Docs. This means no more switching. Each writer can use the best application for them.
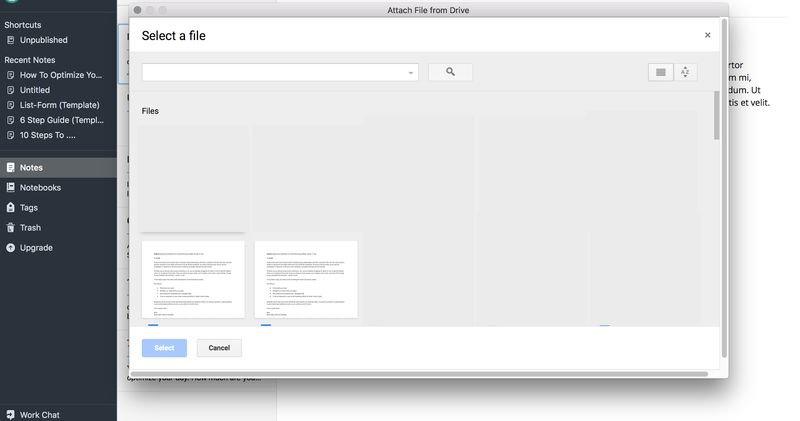
Click the Google Drive icon in your note toolbar at the top. You will be asked to enter your details and allow Evernote access to your Google account the first time. Once this is done, click the Google Drive icon on the Evernote toolbar to browse your files and select the ones you want to add to your note.
(Source: Author’s screenshot)
Add your linked files to your shared notebook to make them accessible to everyone in your team. Your colleagues can even use Web Clipper within the Google Docs application to annotate your work and give you feedback on your drafts.
Don’t be the cliched lonely writer. With Evernote, it is easier than ever to piece together a post along with other writers, bloggers, businesses, and magazines—wherever they are in the world. Have a little help from your friends.
Publish!
With so much support for writing blog posts, it is no wonder that Evernote has teamed up with our platform to make publication as easy as it could be. With integration for Postach.io blogs, you can publish posts easily and quickly without the need to open up your browser and sign in.
Syncing your work with your blog is as simple as assigning a tag.

(Source: Author’s screenshot)
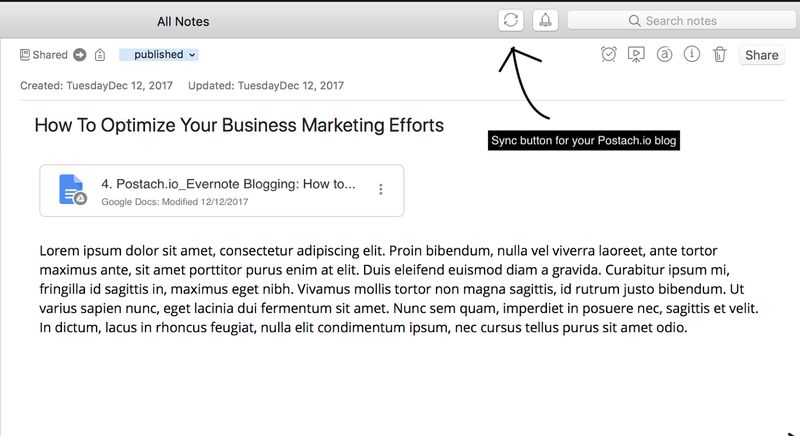
Connect your Evernote account to your Postach.io blog when you sign up. When you think you have produced a finished post, tag it published. The post will sync with your blog within the next thirty minutes. Or if you can’t wait—press the sync button to publish in an instant.
(Source: Author’s screenshot)
Postach.io is the perfect platform for blogging with Evernote. We put a lot of work into making it it easy to use for the best blogging workflow. With beautiful templates and customizable features to make your blog individual to you, you can get set up and start Evernote blogging within just a few minutes. Sign up to Postach.io now to start making the most of Evernote’s streamlined workflow all the way to publication.
Conclusion
Blogging is more than just typing. It involves idea generation, planning, research, organization, and motivation. Evernote makes these important but timely elements simple, so you can concentrate on writing the words that matter most. It is the perfect application if you want your workflow to be backward-compatible with your brain.
As an experienced marketer, entrepreneur, and writer, I spent years struggling for a process that would provide me with the perfect springboard for a successful blog post. Use the techniques I have discovered to hack your productivity so you not only become a faster blogger but a more consistent one. Your posts will reflect the consistency in structure and logic afforded by the Evernote framework. You will also have more time to spend on other activities to make your voice heard in the bustling digital world.
Get a FREE PDF With the Top 5 Ways to Grow Your Blog!
If you're looking for a simple way to set up your own blog and are familiar with Evernote, Postach.io is free and extremely simple to use - you can get started right away. Publish your first post today!